Rocket Building Plans
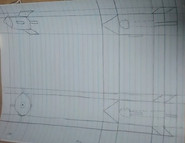
1) The first step is to plan; you need to have 2D sketches and a design of the rocket.
2) The second step is to write down all the measurements for the materials being used on the rocket such as cardboard pieces, nose cone, egg contraption, etc
3) The third step is to create and test the egg contraption. (For our egg contraption we put our egg into a tennis ball filled with peanut butter, and then put the tennis ball into a paper container and attached it to a plastic parachute. Our test failed)
4) The fourth step is to create a final model of the final egg contraption plan. (Our final plan was to wrap our egg in bubble wrap, which we hot glued on, and attached it to a plastic parachute)
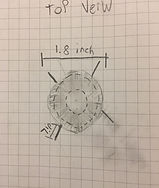
5) The fifth step is to solve the center of pressure and the center of gravity so you will know where to place the fins. You also need to create a sketch for the final model of the rocket with measurements and materials that will be used. (Our center of pressure is 4.259 inches and the center of gravity is 8.5 inches)
6) The sixth step is to create the egg contraption
-First, make a cone shape out of bubble wrap
-Second, hot glue it shut
-Third, cut out the parachute
-Finally, attach strings to both the parachute and bubble wrap using hot glue
7) The seventh and final step is to create the model rocket
-First, glue the engine into the tube
-Second, attach the rings, which are cut out from cardboard, to the tube
-Third, cut out the fins
-Fourth, glue the fins to the body of the rocket (cardboard tube)
-Fifth, glue the rings and smaller tube together to the inside of the big cardboard tube
-Sixth, 3D print the nose cone
-Seventh, glue the nose cone onto the rocket
-Eighth, insert egg contraption into the rocket
-Ninth, paint the rocket
-Tenth, attach small rod to the outer part of the rocket